
Importing and Exporting Grades
Exporting Grades
- From the Navigation Bar, select Grades.

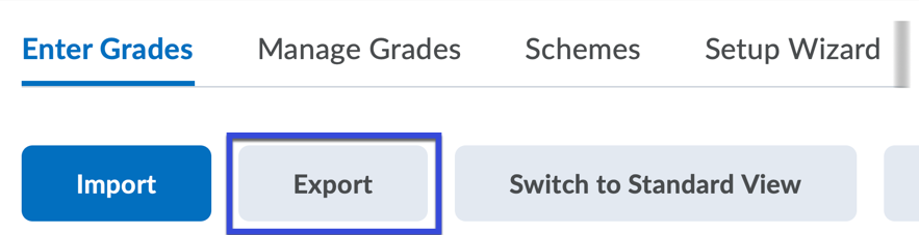
- Select Enter Grades.

- Select Export.
- Select the Radio Button next to the Key Field option you wish to use. NOTE: Org Defined ID will display a Banner Number.
- Select the Checkbox next to the Grade Values options you wish to use.
- Select the Checkbox(es) next to the User Details you wish to use.
- Select the Checkbox next to each Grade Item that you wish to export.
- Select Export to Excel. NOTE: This is opened a new window.
- Select the File Link to download and save the file.
Importing Grades – Preparing the File
NOTE: Grade Categories must be created within D2L. If you wish to have your grade items organized into categories, it is recommended that you create the Grade Categories prior to importing. For instructions on creating Grade Categories, please visit Creating Grade Categories and Items.
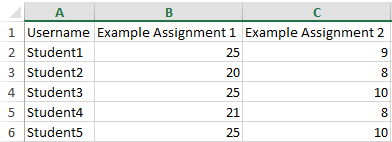
- Column 1: OrgDefinedID (The Student’s Banner or X Number)
- Column 2: Username NOTE: Files can be imported using OrgDefinedID and/or Username columns. Only one column is required.
- Grade Item Columns should contain the name of the item followed by:
- For Numeric or Pass/Fail Grade Items Points Grade (Example: Essay 1 Points Grade)
- For Selectbox Grade Items Grade Symbol (Example: Essay 1 Grade Symbol)
- For Text Grade Items Text Grade (Example: Comments Text Grade)
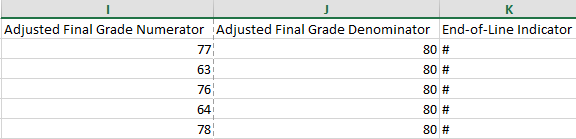
- If using the Final Adjusted Grade (Not Required), the following columns should be included:
- Adjusted Final Grade Numerator
- Adjusted Final Grade Denominator
- The LAST column must be called End-of-Line Indicator and the value for each row in that column must be a hash/pound sign (#).
- Files must be saved as .CSV or .TXT files.
NOTE: Only Numeric, Pass/Fail, Selectbox, Text grade items, and the Final Adjusted Grade can be imported. The Final Calculated Grade will automatically be updated based on the imported grade data.
- Sample Import Grades File for Courses NOT Using the Final Adjusted Grade
- Sample Import Grades File for Courses Using the Final Adjusted Grades
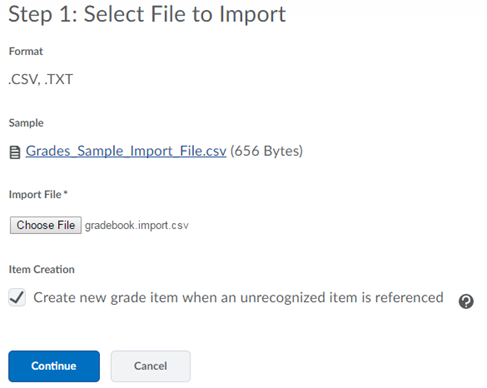
Importing Grades – Uploading the File
NOTE: Only Numeric, Pass/Fail, Selectbox, Text grade items, and the Final Adjusted Grade can be imported. The Final Calculated Grade will automatically be updated based on the imported grade data.
- From the Navigation Bar, select Grades.
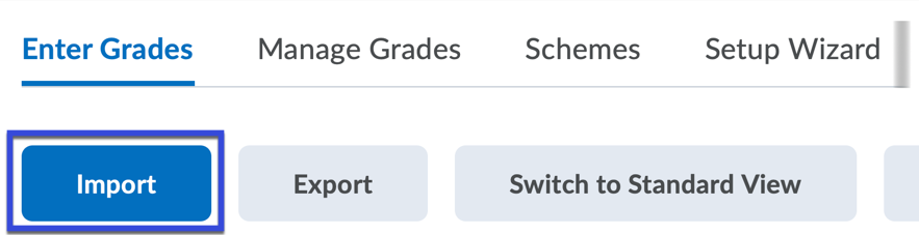
- Select Enter Grades.
- Select Import.
- Select Choose File (Safari and Chrome) or Browse (Firefox and IE).
- Navigate to the .CSV or .TXT File to be uploaded. NOTE: Only .CSV and .TXT file types are accepted.
- Select Open (PC) or Choose (Mac).
- Select the Checkbox next to “Create new grade item when an unrecognized item is referenced”.
- Select Continue.
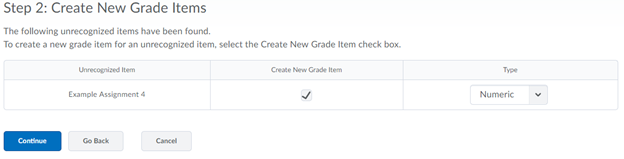
- Review the New Grade Items to be created.
- Select the type of grade item to create (Numeric, Pass/Fail, Selectbox, or Text). NOTE: If you have columns in your gradebook import file that you do not want created in this step, uncheck the box for that item in the Create New Grade Item column.
- Select Continue.
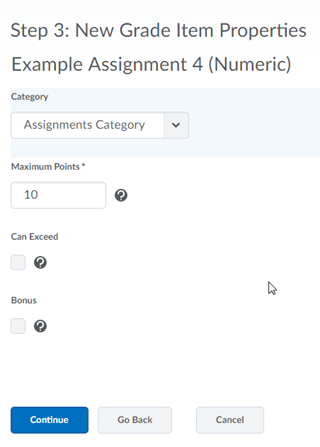
- For each new grade item, select a Grades Category, enter the Maximum Points and select if the item Can Exceed the maximum points and if it is a Bonus (extra credit) grade item. NOTE: If you have created grade categories, select the category for each new grade item in this step.
- Select Continue.
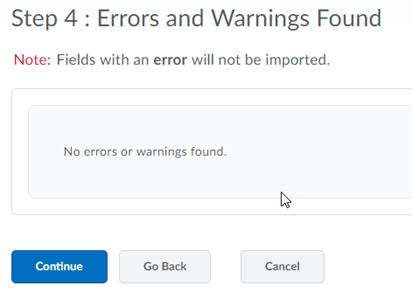
- Make Note of any Errors that are reported.
- Cancel the import process and edit the import file.
- Correct any errors in the gradebook in D2L after the import process is completed.
- Select Go Back to return to the previous step and edit the individual grade item information.
If errors are detected, you may need to: - If no errors occurred, select Continue.
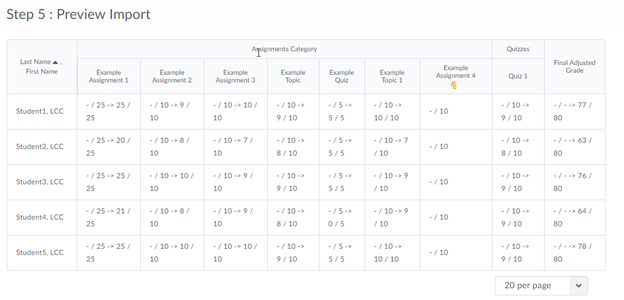
- Review the Gradebook Data to be imported.
- Select Import.
- You will automatically be taken to the Enter Grades screen in the D2L Grades area. NOTE: For instructions on manually entering/modifying grades for existing grade items, please visit Entering Grades.